Build OpenCV (including Python) with CUDA on Windows
OpenCV, CUDA, Windows, Python, Build, Compile, CMake, Ninja, cuDNN, cudacodec, Nvidia Video Codec SDK

Why manually build OpenCV?
The pre-built Windows libraries available for OpenCV do not include the CUDA modules, support for the Nvidia Video Codec SDK or cuDNN.
If you just need the Windows libraries or a Python wheel take a look at OpenCV C++ CUDA builds and/or OpenCV Python CUDA wheels to see if there is a pre-built version suitable for your setup.
To see if building the OpenCV CUDA modules is suitable for your application you can get an indication of the performance boost of most functions in OpenCV CUDA Performance Comparison (Nvidia vs Intel).
Before you begin quickly check which parts of the guide are relevant to you
This guide assumes you are building the latest stable release of OpenCV against the most recent CUDA dependencies. Whilst the instructions can also work on older versions, this is not guaranteed so please update to the latest stable releases before raising any issues.
If you just need the OpenCV binaries or a Python wheel which includes the CUDA modules, check OpenCV C++ CUDA builds and/or OpenCV Python CUDA wheels first to see if they are available for your desired combination of OpenCV and CUDA.
If you have previously built and/or are trying to manually install the Python bindings and are facing errors check out the troubleshooting Python bindings installation issues and manually installing OpenCV Python bindings sections first.
If you already have the OpenCV source and the required dependencies and are just looking for the CMake flags they can be found here.
Prerequisites
There are a couple of components you need to download and/or install before you can get started, you first need to:
Install the latest version of Visual Studio, selecting the Desktop development with C++ workload shown in the image below. If you already have an installation ensure that the correct workload is installed and that you have updated to the latest version.
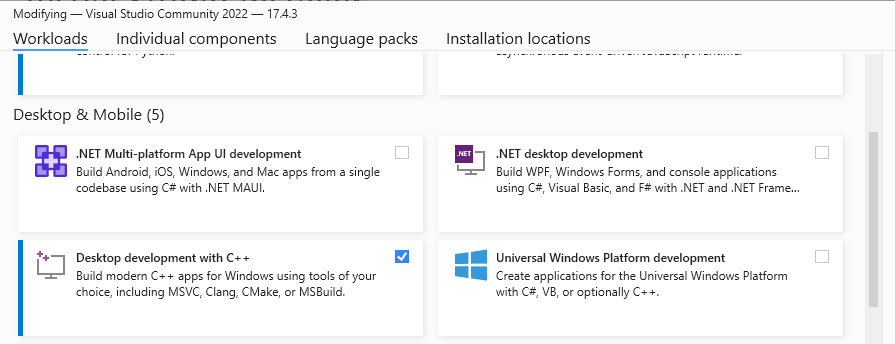
Visual Studio Select C++ Workload Download the source files1 for OpenCV from GitHub by either cloning the repositories (opencv and opencv_contrib) or or downloading the archives containing the source files (opencv.zip and opencv_contirib.zip)
Install the latest stable (not release candidate -rc) version of CMake.
Install both the latest version of the CUDA Toolkit and drivers for your GPU as these are no longer bundled with the Toolkit.
If your system path is too long, CUDA will not add the path to its shared libraries C:\Program Files\NVIDIA GPU Computing Toolkit\CUDA\vxx.x\bin during installation. If you receive a warning about this at the end of the installation process do not forget to manually add the this to your system or user path.
- Optional2 - To decode video on the GPU with the Nvidia Video Codec SDK:
- Register and download the latest version of the Complete Video Codec SDK xx.x Package.
- Extract and copy the contents of Interface and Lib to the include and lib directories inside your CUDA installation.
- Optional - To use the DNN CUDA backend:
- Download the latest version of cuDNN for the version of CUDA you have installed by selecting the Tarball.
- Extract and copy the contents of following directories from the archive,
- bin to CUDA_INSTALL/bin/x64,
- include to CUDA_INSTALL/include, and
- lib to CUDA_INSTALL/lib.
The installation directory for CUDA xx.x is C:\Program Files\NVIDIA GPU Computing Toolkit\CUDA\vxx.x.
Building OpenCV with CMake
Before you can build OpenCV you have to generate the build files with CMake. This can be done via the command line or with the CMake GUI. Most new users will find the GUI more accessible however by far the quickest, easiest and least error prone way to proceed is to call CMake from the command line and as a result I have not included any instructions for using the CMake GUI4.
In addition there are several ways to build OpenCV using Visual Studio. For simplicity only two methods are discussed:
- Building OpenCV with Visual Studio solution files.
- Building OpenCV with the ninja build system to reduce the build time.
Building OpenCV with CUDA using Visual Studio solution files from the command prompt (cmd)
The following steps will build opencv_worldxxx.dll which is suitable for use on the installed GPU and any other GPUs with the “same” compute capability. This is the best way to get started as it has the smallest build time, but it will limit your options if you want to build software which runs on a range of different GPUs. To fully understand the implications of this please read choosing a suitable CUDA compute capability.
Visual Studio is painfully slow when compiling OpenCV with CUDA, to reduce the build time I recommended always using the Ninja build system instead, see the Ninja tab below for the command line arguments and building OpenCV with the ninja build system to reduce the build time for more information.
- Open windows command prompt, type cmd in the Windows search bar.
Paste the below5 into to the command prompt and press Enter.
set CMAKE_BUILD_PARALLEL_LEVEL=<N_THREADS>
"C:\Program Files\CMake\bin\cmake.exe" -H"<PATH_TO_OPENCV_SOURCE>" -DOPENCV_EXTRA_MODULES_PATH="<PATH_TO_OPENCV_CONTRIB_MODULES>" -B"<PATH_TO_BUILD_DIR>" -G"Visual Studio 17 2022" -DINSTALL_TESTS=ON -DINSTALL_C_EXAMPLES=ON -DBUILD_EXAMPLES=ON -DBUILD_opencv_world=ON -DENABLE_CUDA_FIRST_CLASS_LANGUAGE=ON -DWITH_CUDA=ON -DCUDA_GENERATION=Auto -DBUILD_opencv_python3=ON -DPYTHON3_INCLUDE_DIR=<PATH_TO_PYTHON_DIST>/include -DPYTHON3_LIBRARY=<PATH_TO_PYTHON_DIST>/libs/<PYTHON_Lib> -DPYTHON3_EXECUTABLE=<PATH_TO_PYTHON_DIST>/python.exe -DPYTHON3_NUMPY_INCLUDE_DIRS=<PATH_TO_PYTHON_DIST>/lib/site-packages/numpy/_core/include -DPYTHON3_PACKAGES_PATH=<PATH_TO_PYTHON_DIST>/Lib/site-packages
If you just want to CUDA accelerate the DNN module and are not interested in building the rest of the CUDA modules this will significantly reduce compilation time and size of opencv_worldxxx.dll.
set CMAKE_BUILD_PARALLEL_LEVEL=<N_THREADS>
"C:\Program Files\CMake\bin\cmake.exe" -H"<PATH_TO_OPENCV_SOURCE>" -DOPENCV_EXTRA_MODULES_PATH="<PATH_TO_OPENCV_CONTRIB_MODULES>" -B"<PATH_TO_BUILD_DIR>" -G"Visual Studio 17 2022" -DINSTALL_TESTS=ON -DINSTALL_C_EXAMPLES=ON -DBUILD_EXAMPLES=ON -DBUILD_opencv_world=ON -DENABLE_CUDA_FIRST_CLASS_LANGUAGE=ON -DWITH_CUDA=ON -DCUDA_GENERATION=Auto -DBUILD_opencv_cudaarithm=OFF -DBUILD_opencv_cudabgsegm=OFF -DBUILD_opencv_cudafeatures2d=OFF -DBUILD_opencv_cudafilters=OFF -DBUILD_opencv_cudaimgproc=OFF -DBUILD_opencv_cudalegacy=OFF -DBUILD_opencv_cudaobjdetect=OFF -DBUILD_opencv_cudaoptflow=OFF -DBUILD_opencv_cudastereo=OFF -DBUILD_opencv_cudawarping=OFF -DBUILD_opencv_cudacodec=OFF -DBUILD_opencv_python3=ON -DPYTHON3_INCLUDE_DIR=<PATH_TO_PYTHON_DIST>/include -DPYTHON3_LIBRARY=<PATH_TO_PYTHON_DIST>/libs/<PYTHON_Lib> -DPYTHON3_EXECUTABLE=<PATH_TO_PYTHON_DIST>/python.exe -DPYTHON3_NUMPY_INCLUDE_DIRS=<PATH_TO_PYTHON_DIST>/lib/site-packages/numpy/_core/include -DPYTHON3_PACKAGES_PATH=<PATH_TO_PYTHON_DIST>/Lib/site-packages
set CMAKE_BUILD_PARALLEL_LEVEL=<N_THREADS> "C:\Program Files\CMake\bin\cmake.exe" -H"<PATH_TO_OPENCV_SOURCE>" -DOPENCV_EXTRA_MODULES_PATH="<PATH_TO_OPENCV_CONTRIB_MODULES>" -B"<PATH_TO_BUILD_DIR>" -G"Visual Studio 17 2022" -DINSTALL_TESTS=ON -DINSTALL_C_EXAMPLES=ON -DBUILD_EXAMPLES=ON -DBUILD_opencv_world=ON -DENABLE_CUDA_FIRST_CLASS_LANGUAGE=ON -DWITH_CUDA=ON -DCUDA_GENERATION=Autoset CMAKE_BUILD_PARALLEL_LEVEL=<N_THREADS> "C:\Program Files\CMake\bin\cmake.exe" -H"<PATH_TO_OPENCV_SOURCE>" -DOPENCV_EXTRA_MODULES_PATH="<PATH_TO_OPENCV_CONTRIB_MODULES>" -B"<PATH_TO_BUILD_DIR>" -G"Visual Studio 17 2022" -DINSTALL_TESTS=ON -DINSTALL_C_EXAMPLES=ON -DBUILD_EXAMPLES=ON -DBUILD_opencv_world=ON -DBUILD_opencv_python3=ON -DPYTHON3_INCLUDE_DIR=<PATH_TO_PYTHON_DIST>/include -DPYTHON3_LIBRARY=<PATH_TO_PYTHON_DIST>/libs/<PYTHON_Lib> -DPYTHON3_EXECUTABLE=<PATH_TO_PYTHON_DIST>/python.exe -DPYTHON3_NUMPY_INCLUDE_DIRS=<PATH_TO_PYTHON_DIST>/lib/site-packages/numpy/_core/include -DPYTHON3_PACKAGES_PATH=<PATH_TO_PYTHON_DIST>/Lib/site-packagesFor details see decreasing the build time with Ninja
"C:\Program Files\Microsoft Visual Studio\2022\Community\VC\Auxiliary\Build\vcvars64.bat"
"C:\Program Files\CMake\bin\cmake.exe" -H"<PATH_TO_OPENCV_SOURCE>" -DOPENCV_EXTRA_MODULES_PATH="<PATH_TO_OPENCV_CONTRIB_MODULES>" -B"<PATH_TO_BUILD_DIR>" -G"Ninja Multi-Config"" -DCMAKE_BUILD_TYPE=Release -DINSTALL_TESTS=ON -DINSTALL_C_EXAMPLES=ON -DBUILD_EXAMPLES=ON -DBUILD_opencv_world=ON -DENABLE_CUDA_FIRST_CLASS_LANGUAGE=ON -DWITH_CUDA=ON -DCUDA_GENERATION=Auto -DBUILD_opencv_python3=ON -DPYTHON3_INCLUDE_DIR=<PATH_TO_PYTHON_DIST>/include -DPYTHON3_LIBRARY=<PATH_TO_PYTHON_DIST>/libs/<PYTHON_Lib> -DPYTHON3_EXECUTABLE=<PATH_TO_PYTHON_DIST>/python.exe -DPYTHON3_NUMPY_INCLUDE_DIRS=<PATH_TO_PYTHON_DIST>/lib/site-packages/numpy/_core/include -DPYTHON3_PACKAGES_PATH=<PATH_TO_PYTHON_DIST>/Lib/site-packages
Following the configuration step the build is started with
"C:\Program Files\CMake\bin\cmake.exe" --build PATH_TO_BUILD_DIR --target install --config Releasewhere
- <N_THREADS> should be set to the number of cores/logical processors on your CPU,
- <PATH_TO_OPENCV_SOURCE> is the root of the OpenCV files you downloaded or cloned (the directory containing 3rdparty, apps, build, etc.),
- <PATH_TO_OPENCV_CONTRIB_MODULES>6 is the path to the modules directory inside the opencv-contrib repository (the directory containing cudaarithm, cudabgsegm, etc.),
- <PATH_TO_BUILD_DIR> is the path to the directory where the build files should go,
- <PATH_TO_PYTHON_DIST>7 is the directory where miniforge was installed and,
- <PYTHON_LIB> is the concatination of “python” with the major and minor version of your python install and “.lib”, e.g. for Python 3.10.6 <PYTHON_LIB>==python310.lib. You can confirm this by looking in your <PATH_TO_PYTHON_DIST>/libs directory.
WarningWhen passing paths to CMake on the command line make sure not to terminate them using \ as this is a special character and will cause the following arguments to be ignored. e.g. PATH_TO_OPENCV_SOURCE can be D:\opencv or D:\opencv/ but not D:\opencv\.
This will generate the build files for OpenCV with python bindings with CUDA acceleration including all the corresponding tests and examples for verifcation. Additionally if the Nvidia Video Codec SDK or cuDNN are installed the corresponding modules will automatically be included.
Expand the tips below for an example of the CMake output if the configuration step is successful and how to check that output to make sure the Python bindings will be being built.
Example of CMake Configuration Output-- General configuration for OpenCV 4.13.0-dev ===================================== -- Version control: 4.12.0-63-g3278820f5d -- -- Extra modules: -- Location (extra): D:/repos/opencv/contrib/modules -- Version control (extra): 4.12.0-7-g9a9b173c -- -- Platform: -- Timestamp: 2025-08-07T14:26:42Z -- Host: Windows 10.0.26100 AMD64 -- CMake: 4.0.1 -- CMake generator: Ninja Multi-Config -- CMake build tool: D:/bin/ninja/ninja.exe -- MSVC: 1944 -- Configuration: Debug Release -- Algorithm Hint: ALGO_HINT_ACCURATE -- -- CPU/HW features: -- Baseline: SSE SSE2 SSE3 -- requested: SSE3 -- Dispatched code generation: SSE4_1 SSE4_2 AVX FP16 AVX2 AVX512_SKX -- SSE4_1 (19 files): + SSSE3 SSE4_1 -- SSE4_2 (2 files): + SSSE3 SSE4_1 POPCNT SSE4_2 -- AVX (10 files): + SSSE3 SSE4_1 POPCNT SSE4_2 AVX -- FP16 (1 files): + SSSE3 SSE4_1 POPCNT SSE4_2 AVX FP16 -- AVX2 (39 files): + SSSE3 SSE4_1 POPCNT SSE4_2 AVX FP16 AVX2 FMA3 -- AVX512_SKX (9 files): + SSSE3 SSE4_1 POPCNT SSE4_2 AVX FP16 AVX2 FMA3 AVX_512F AVX512_COMMON AVX512_SKX -- -- C/C++: -- Built as dynamic libs?: YES -- C++ standard: 11 -- C++ Compiler: C:/Program Files/Microsoft Visual Studio/2022/Community/VC/Tools/MSVC/14.44.35207/bin/Hostx64/x64/cl.exe (ver 19.44.35213.0) -- C++ flags (Release): /DWIN32 /D_WINDOWS /W4 /GR /D _CRT_SECURE_NO_DEPRECATE /D _CRT_NONSTDC_NO_DEPRECATE /D _SCL_SECURE_NO_WARNINGS /Gy /bigobj /Oi /fp:precise /FS /EHa /wd4127 /wd4251 /wd4324 /wd4275 /wd4512 /wd4589 /wd4819 /O2 /Ob2 /DNDEBUG /Zi -- C++ flags (Debug): /DWIN32 /D_WINDOWS /W4 /GR /D _CRT_SECURE_NO_DEPRECATE /D _CRT_NONSTDC_NO_DEPRECATE /D _SCL_SECURE_NO_WARNINGS /Gy /bigobj /Oi /fp:precise /FS /EHa /wd4127 /wd4251 /wd4324 /wd4275 /wd4512 /wd4589 /wd4819 /Zi /Ob0 /Od /RTC1 -- C Compiler: C:/Program Files/Microsoft Visual Studio/2022/Community/VC/Tools/MSVC/14.44.35207/bin/Hostx64/x64/cl.exe -- C flags (Release): /DWIN32 /D_WINDOWS /W3 /D _CRT_SECURE_NO_DEPRECATE /D _CRT_NONSTDC_NO_DEPRECATE /D _SCL_SECURE_NO_WARNINGS /Gy /bigobj /Oi /fp:precise /FS /O2 /Ob2 /DNDEBUG /Zi -- C flags (Debug): /DWIN32 /D_WINDOWS /W3 /D _CRT_SECURE_NO_DEPRECATE /D _CRT_NONSTDC_NO_DEPRECATE /D _SCL_SECURE_NO_WARNINGS /Gy /bigobj /Oi /fp:precise /FS /Zi /Ob0 /Od /RTC1 -- Linker flags (Release): /machine:x64 /INCREMENTAL:NO /debug -- Linker flags (Debug): /machine:x64 /debug /INCREMENTAL -- ccache: NO -- Precompiled headers: NO -- Extra dependencies: C:/Program Files/NVIDIA GPU Computing Toolkit/CUDA/v13.0/lib/x64/cudart_static.lib C:/Program Files/NVIDIA GPU Computing Toolkit/CUDA/v13.0/lib/x64/nppial.lib C:/Program Files/NVIDIA GPU Computing Toolkit/CUDA/v13.0/lib/x64/nppc.lib C:/Program Files/NVIDIA GPU Computing Toolkit/CUDA/v13.0/lib/x64/nppitc.lib C:/Program Files/NVIDIA GPU Computing Toolkit/CUDA/v13.0/lib/x64/nppig.lib C:/Program Files/NVIDIA GPU Computing Toolkit/CUDA/v13.0/lib/x64/nppist.lib C:/Program Files/NVIDIA GPU Computing Toolkit/CUDA/v13.0/lib/x64/nppidei.lib C:/Program Files/NVIDIA GPU Computing Toolkit/CUDA/v13.0/lib/x64/cublas.lib C:/Program Files/NVIDIA GPU Computing Toolkit/CUDA/v13.0/lib/x64/cublasLt.lib C:/Program Files/NVIDIA GPU Computing Toolkit/CUDA/v13.0/lib/x64/cufft.lib C:/Program Files/NVIDIA GPU Computing Toolkit/CUDA/v13.0/lib/x64/nppicc.lib C:/Program Files/NVIDIA GPU Computing Toolkit/CUDA/v13.0/lib/x64/nppif.lib C:/Program Files/NVIDIA GPU Computing Toolkit/CUDA/v13.0/lib/x64/nppim.lib -- 3rdparty dependencies: -- -- OpenCV modules: -- To be built: aruco bgsegm bioinspired calib3d ccalib core cudaarithm cudabgsegm cudacodec cudafeatures2d cudafilters cudaimgproc cudalegacy cudaobjdetect cudaoptflow cudastereo cudawarping cudev datasets dnn dnn_objdetect dnn_superres dpm face features2d flann fuzzy gapi hfs highgui img_hash imgcodecs imgproc intensity_transform line_descriptor mcc ml objdetect optflow phase_unwrapping photo plot python3 quality rapid reg rgbd saliency shape signal stereo stitching structured_light superres surface_matching text tracking ts video videoio videostab wechat_qrcode xfeatures2d ximgproc xobjdetect xphoto -- Disabled: world -- Disabled by dependency: - -- Unavailable: alphamat cannops cvv fastcv freetype hdf java julia matlab ovis python2 sfm viz -- Applications: tests perf_tests examples apps -- Documentation: doxygen python -- Non-free algorithms: NO -- -- Windows RT support: NO -- -- GUI: WIN32UI -- Win32 UI: YES -- OpenGL support: YES (opengl32 glu32) -- VTK support: NO -- -- Media I/O: -- ZLib: build (ver 1.3.1) -- JPEG: build-libjpeg-turbo (ver 3.1.0-70) -- SIMD Support Request: YES -- SIMD Support: NO -- WEBP: build (ver decoder: 0x0209, encoder: 0x020f, demux: 0x0107) -- AVIF: NO -- PNG: build (ver 1.6.43) -- SIMD Support Request: YES -- SIMD Support: YES (Intel SSE) -- TIFF: build (ver 42 - 4.6.0) -- JPEG 2000: build (ver 2.5.3) -- OpenEXR: build (ver 2.3.0) -- GIF: YES -- HDR: YES -- SUNRASTER: YES -- PXM: YES -- PFM: YES -- -- Video I/O: -- FFMPEG: YES (find_package) -- avcodec: YES (59.18.100) -- avformat: YES (59.16.100) -- avutil: YES (57.17.100) -- swscale: YES (6.4.100) -- avresample: NO -- GStreamer: NO -- DirectShow: YES -- Media Foundation: YES -- DXVA: YES -- -- Parallel framework: Concurrency -- -- Trace: YES (with Intel ITT(3.25.4)) -- -- Other third-party libraries: -- Intel IPP: 2022.1.0 [2022.1.0] -- at: D:/build/opencv/cuda_13/3rdparty/ippicv/ippicv_win/icv -- Intel IPP IW: sources (2022.1.0) -- at: D:/build/opencv/cuda_13/3rdparty/ippicv/ippicv_win/iw -- Lapack: NO -- Eigen: NO -- Custom HAL: YES (ipp (ver 0.0.1)) -- Protobuf: build (3.19.1) -- Flatbuffers: builtin/3rdparty (23.5.9) -- -- NVIDIA CUDA: YES (ver 13.0.48, CUFFT CUBLAS NVCUVID NVCUVENC) -- NVIDIA GPU arch: 86 -- NVIDIA PTX archs: -- -- cuDNN: YES (ver 9.11.0) -- -- OpenCL: YES (NVD3D11) -- Include path: D:/repos/opencv/opencv/3rdparty/include/opencl/1.2 -- Link libraries: Dynamic load -- -- Python 3: -- Interpreter: C:/Users/b/miniforge3/python.exe (ver 3.10.14) -- Libraries: C:/Users/b/miniforge3/libs/python310.lib (ver 3.10.14) -- Limited API: NO -- numpy: C:/Users/b/miniforge3/lib/site-packages/numpy/_core/include (ver 2.2.6) -- install path: C:/Users/b/miniforge3/Lib/site-packages/cv2/python-3.10 -- -- Python (for build): C:/Users/b/miniforge3/python.exe -- -- Java: -- ant: NO -- Java: NO -- JNI: NO -- Java wrappers: NO -- Java tests: NO -- -- Install to: D:/build/opencv/cuda_13/install -- ----------------------------------------------------------------- -- -- Configuring done (28.9s) -- Generating done (5.9s) -- Build files have been written to: D:/build/opencv/cuda_13Verify configuration includes Python bindings before buildingIf you are building the python bindings look for python3 in the To be built: section of your CMake configuration output and if its not present look for any python related errors in the output preceeding it. e.g.
--   OpenCV modules:
--     To be built:                 aruco bgsegm bioinspired calib3d ccalib core cudaarithm cudabgsegm cudacodec cudafeatures2d cudafilters cudaimgproc cudalegacy cudaobjdetect cudaoptflow cudastereo cudawarping cudev datasets dnn dnn_objdetect dpm face features2d flann fuzzy hfs highgui img_hash imgcodecs imgproc line_descriptor ml objdetect optflow phase_unwrapping photo plot python2 python3 quality reg rgbd saliency shape stereo stitching structured_light superres surface_matching text tracking ts video videoio videostab world xfeatures2d ximgproc xobjdetect xphoto
The OpenCV.sln solution file should now be in your PATH_TO_BUILD_DIR directory. To build OpenCV you have two options depending on you preference you can:
Build directly from the command line by simply entering the following (swaping Release for Debug to build a release version)
"C:\Program Files\CMake\bin\cmake.exe" --build PATH_TO_BUILD_DIR --target install --config DebugBuild through Visual Studio GUI by opening up the OpenCV.sln in Visual Studio, selecting your Configuration, clicking on Solution Explorer, expanding CMakeTargets, right clicking on INSTALL and clicking Build.
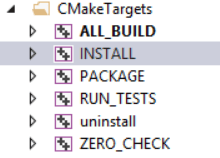
Visual Studio Build Solution
Either approach will both build the library, install the Python bindings and copy the necessary redistributable parts to the install directory (PATH_TO_BUILD_DIR/build/install). All that is required now to run any programs compiled against these libs is to add the directory containing opencv_worldxxx.dll to you user path environmental variable.
By default you have to build Release when generating python bindings, for instructions on how to build Debug see generate python bindings for a debug build
If everything was successful, congratulations, you now have OpenCV built with CUDA. To quickly verify that the CUDA modules are working and check if there is any performance benefit on your specific hardware see verifying OpenCV is CUDA accelerated.
Decreasing the build time with Ninja
The build time for OpenCV can be reduced by more than 2x (from 2 hours to 30 mins to under an hour on an i7-8700) by utilizing the Ninja build system instead of directly generating Visual Studio solution files.
Ninja is installed by default if the Desktop development with C++ workload is selected when installing Visual Studio, therefore building with Ninja only requires two extra configuration steps:
Configuring Visual Studio Development tools by entering the following into the command prompt before entering the CMake command (changing Community to either Professional or Enterprise if necessary)
"C:\Program Files\Microsoft Visual Studio\2022\Community\VC\Auxiliary\Build\vcvars64.bat"Telling CMake to use Ninja instead of Visual Studio, i.e. replacing -G"Visual Studio 17 2022" with -G"Ninja Multi-Config".
Once the build files have been generated the build can be kicked off in the same way as before. i.e.
"C:\Program Files\CMake\bin\cmake.exe" --build PATH_TO_BUILD_DIR --target install --config Releasefor an example fo the full command line for building a Release version of OpenCV with the Ninja build system go to the Ninja tab.
Verifying OpenCV is CUDA accelerated
The easiest way to quickly verify that everything is working is to check that one of the inbuilt CUDA tests passes. This is demonstrated here using the GEMM8 acccuracy test which can be run by entering the following into the existing command prompt.
"PATH_TO_BUILD_DIR\bin\opencv_test_cudaarithm.exe" --gtest_filter=CUDA_Arithm/GEMM.Accuracy/0To verify that everything is working look for the [ PASSED ] 1 test text, at the bottom of the test output, i.e.
[==========] Running 1 test from 1 test case.
[----------] Global test environment set-up.
[----------] 1 test from CUDA_Arithm/GEMM
[ RUN      ] CUDA_Arithm/GEMM.Accuracy/0, where GetParam() = (NVIDIA GeForce RTX 3070 Ti Laptop GPU, 128x128, 32FC1, 0, whole matrix)
[       OK ] CUDA_Arithm/GEMM.Accuracy/0 (1038 ms)
[----------] 1 test from CUDA_Arithm/GEMM (1039 ms total)

[----------] Global test environment tear-down
[==========] 1 test from 1 test case ran. (1041 ms total)
[  PASSED  ] 1 test.
If the test has passed then we can confirm that the OpenCV build inside PATH_TO_BUILD_DIR includes the CUDA modules.
Python bindings
The instructions above will enable you to build a Release version of OpenCV with bindings for Python and automatically install them into your PATH_TO_PYTHON_DIST/site-packages directory. You can then import the OpenCV python module (cv2) as
import cv2 as cvand you should see output similar to the below when interrogating the build information
>>> print(cv2.getBuildInformation())

General configuration for OpenCV 4.10.0-dev =====================================
  Version control:               4.9.0-571-g2629688d11

  Extra modules:
    Location (extra):            D:/repos/opencv/contrib/modules
    Version control (extra):     4.9.0-84-gb236c71c

  Platform:
    Timestamp:                   2024-06-11T08:50:41Z
    Host:                        Windows 10.0.22631 AMD64
    CMake:                       3.29.5
    CMake generator:             Ninja Multi-Config
    CMake build tool:            D:/bin/ninja/ninja.exe
    MSVC:                        1940
    Configuration:               Debug Release
    ...
That said you may:
- Want to build bindings for a Debug as well or instead of a Release build.
- Encounter errors when trying to import the cv2 module in Python.
- Manually install the Python bindings.
Generate Python bindings for a Debug Build
Python bindings cannot by default be generated for a Debug configuration, that is unless you have specificaly built or downloaded a debug version of Python. That said you can make a Debug build if you first modify the contents of PATH_TO_PYTHON_DIST/include/pyconfig.h, changing
pragma comment(lib,"pythonxx_d.lib")to
pragma comment(lib,"pythonxx.lib")and
# define Py_DEBUGto
//# define Py_DEBUGThen simply follow the instructions above for building with CMake.
Troubleshooting Python Bindings Installation issues
If you are unable to import cv2 without errors then check below to see if there is a solution to the error you recieve.
ModuleNotFoundError: No module named 'cv2'The installation of the Python bindings has failed, check
- the build was successful,
- -DPYTHON3_PACKAGES_PATH=PATH_TO_PYTHON_DIST/Lib/site-packages/ was set correctly, and
- if you are still seeing the above error try manually installing opencv Python bindings.
ImportError: ERROR: recursion is detected during loading of "cv2" binary extensions. Check OpenCV installation.The main two reasons for this are:
You have another installation of OpenCV, either manually installed or through the package manager (pip/mamba etc.). This can easily be fixed by first uninstalling any opencv-python, opencv-contrib-python distributions from your package manager and then deleting the cv2 directory (PATH_TO_PYTHON_DIST/Lib/site-packages/cv2/) or bindings file (PATH_TO_PYTHON_DIST/Lib/site-packages/cv2.cpxx-win_amd64.pyd) if they exist.
You have built a Debug configuration. Currently (https://github.com/opencv/opencv/issues/23568) when building this configuration the cv2.cpxx-win_amd64.pyd shared library is not copied into site-packages-x.x
directory on installation. This can easily be resolved by creating the python-x.x directory and copying the shared library accross so you have PATH_TO_PYTHON_DIST/Lib/site-packages/cv2/python-x.x/cv2.cpxx-win_amd64.pyd, where xx is the PYTHON_VERSION.
ImportError: DLL load failed: The specified module could not be found.The directory of one or more of the required DLL’s has not been added with os.add_dll_directory(). Whilst the automatic installation of the bindings should have added all the directories containing the dependant DLL’s to config.py it’s possible that one has been missed or you are using a less common configuration. In these cases you will have to
- first track down which DLL’s are missing (see this guide for assistance) and then
- permanantly add the directory containing them to your installation by modifying the contents of PATH_TO_PYTHON_DIST/Lib/site-packages/cv2/config.py.
e.g. If you built OpenCV against CUDA 12.1 and your own version of the FFMpeg libraries (-DOPENCV_FFMPEG_USE_FIND_PACKAGE=ON) instead of using the provided opencv_videoio_ffmpegxxx_64.dll plugin, the contents of config.py should look like
import os BINARIES_PATHS = [ os.path.join('D:/build/opencv/install', 'x64/vc17/bin'), os.path.join(os.getenv('CUDA_PATH', 'C:/Program Files/NVIDIA GPU Computing Toolkit/CUDA/v12.5'), 'bin') os.path.join(`D:/ffmpeg/bin`) ] + BINARIES_PATHSImportError: DLL load failed while importing cv2: A dynamic link library (DLL) initialization routine failed.The most common cause of this is out of date Visual C++ Redistributable libraries. These can be loaded from your windows system or your python installation depending on your configuration. The easiest thing to do is update both by
- downloading and installing the latest version of the Visual C++ Redistributable from Microsoft, and
- checking your python package manager (pip/mamba/conda/… list) for the vc or vc14_runtime packages and updating them to the latest version (e.g.
pip install vc --upgradeormamba/conda upgrade vc) and try importing OpenCV again.
Manually installing OpenCV Python bindings
If you have downloaded the pre-built binaries or are having issues with the automatic installation then you can manually install the python bindings following the steps below:
Copy PATH_TO_BUILD_DIR/lib/python3/cv2.cpxx-win_amd64.pyd to PATH_TO_PYTHON_DIST/Lib/site-packages/cv2.cpxx-win_amd64.pyd
Determine the paths to the directories containing any dependant shared libraries (see here for assistance).
Adding the locations from (3) by calling os.add_dll_directory() for each one before importing the OpenCV python module. e.g. If you have followed the guide exactly this will be the directories containing the OpenCV and Nvidia shared libaries, which you would add as
import os
os.add_dll_directory('C:\\Program Files\\NVIDIA GPU Computing Toolkit\\CUDA\\vxx.x\\bin')
os.add_dll_directory('PATH_TO_BUILD_DIR/bin')
before calling
import cv2 as cv
Choosing a suitable CUDA compute capability
The default command line options given above will build a version of OpenCV which runs on the GPUs which are installed at configuration time. As mentioned above depending on your circumstances this might be the best solution. e.g. If you don’t have a GPU installed on the build system. Before discussing the various options which can be used to add support for GPUs with different compute capabilities to those installed on your system it is important to understand the following concepts:
- Compute capability – every GPU has a fixed compute capability which determines its general specifications and features. In general the more recent the GPU the higher the compute-capability and the more features it will support. This is important because:
- Each version of CUDA supports different compute capabilities. Usually a new version of CUDA comes out to suppoort a new GPU architecture, in the case of CUDA 11.0, support was added for the Ampere (compute 8.0, with compute 8.6 added in CUDA 11.1) architecture. On the flip side support for compute 3.0 and 3.2 was dropped. Therefore by if we chose to build OpenCV with CUDA 11.0 we limit ourselves to GPU’s of compute capability >=3.5. Notice we have not limited ourselves to compute capability GPU’s <=8.6, the reason for this is discussed in the next section.
- You can build OpenCV to support one or many different compute capabilities, depending on your specific requirements.
- Supporting a compute capability - to support a specific compute capability you can do either of the following, or a combination of the two:
- Generate architecture-specific cubin files, which are only forward-compatible (excluding Tegra) with GPU architectures with the same major version number. This can be controlled by passing the CUDA_ARCH_BIN flag to CMake. For example passing -DCUDA_ARCH_BIN=3.0 to CMake, will result in binary code which can only run on compute capability 3.0, 3.5 and 3.7 devices. Futhermore it will not support any specific features of compute capability 3.5 (e.g. dynamic parallelism) or 3.7 (e.g. 128 K 32 bit registers). You can detrmine which functions this will affect by searching OpenCV on github for the CUDA_ARCH flag. Because of the default CMake rules when CUDA_ARCH_BIN is not explicitly set it will also contain architecture-specific cubin files for all GPU architectures supported by your CUDA version.
- Generate forward-compatible PTX assembly for a virtual architecture, which is forward-compatable with all GPU architectures of greater than or equal compute-capability. This can be controlled by passing CUDA_ARCH_PTX to CMake. e.g. Setting the -DCUDA_ARCH_PTX=9.0 flag, builds OpenCV containing PTX code for compute capability 9.0 which can be Just In Time (JIT) compiled to architecture-specific binary code by the CUDA driver, on any future GPU architectures.
- PTX considerations – given that PTX code is forward-compatible and cubin binaries are not it would be tempting to only include the former. To understand why this might not be such a great idea, a things to be aware of when generating PTX code:
As mentioned previously the CUDA driver JIT compiles PTX code at run time and cache’s the resulting cubin files so that the compile operation should in theory be a one-time delay, at least until the driver is updated. However if the cache is not large enough JIT compilation will happen every time, causing delay every time your program executes.To get an idea of this delay I passed -DCUDA_ARCH_BIN=3.5 and -DCUDA_ARCH_PTX=3.5 to CMake before building OpenCV. I then emptied the cache (default location %appdata%\NVIDIA\ComputeCache\) and ran the performance example on a GTX 1060 (compute-capability 6.1), to force JIT compilation. I measured an initial delay of over 3 minutes as the PTX code was JIT compiled before the program started to execute. Following that, the delay of subsequent executions was around a minute, because the default cache size (256 MB) was not large enough to store all the compiled PTX code. Given my compile options the only solution to remove this delay is to increase the size of the cache by setting the CUDA_CACHE_MAXSIZE environmental variable to a number of bytes greater than required. Unfortunately because,
Older binary codes are evicted from the cache to make room for newer binary codes if needed
this is more of a band aid than a solution. This is because the maximum cache size is 4 GB, therefore your PTX compiled code can be evicted at any point in time if other programs on your machine are also JIT compiling from PTX, bringing back the “one-time” only delay.
For maximum device coverage you should include PTX for the lowest possible GPU architecture you want to support.
For maximum performance NVIDIA recommends including PTX for the highest possible architecture you can.
Footnotes
I have seen lots of guides including instructions to download and use git to get the source files, however this is a completely unnecessary step. If you are a developer and you don’t already have git installed and configured then I would assume there is a good reason for this and I would not advise installing it just to build OpenCV.↩︎
Before building you may want to ensure that your GPU has decoding support by referring to Nvidia Video Decoder Support Matrix↩︎
All python distributions should work however I recommend building and testing against a new install of this compact distribution to avoid any problems caused by existing configurations.↩︎
If you have any build issues with OpenCV then you will need to provide the arguments passed to CMake as well as the output from the generation step when asking for assistance which is another good reason to avoid the CMake GUI if you can.↩︎
An additionally option you may want to include is -DCUDA_FAST_MATH=ON which compiles the CUDA kernels with the -use_fast_math option. This will however cause some of the accuracy and performance tests to fail as the floating point results will be slightly less accurate.↩︎
If you get the following error “CUDA : OpenCV requires enabled ‘cudev’ module from ‘opencv_contrib’” when configuring the build with CMake you have not set OPENCV_EXTRA_MODULES_PATH correctly, most likely you have set it to the root of the opencv_contrib repo and not the modules directory inside the repo.↩︎
The default installation directory for miniforge is %userprofile%\miniforge3.↩︎
The GEMM test is used in this example but any of the accuracy (opencv_test_cuda*.exe) or performance (opencv_perf_cuda*.exe) tests could have been chosen.↩︎